Have you tried to create Sticker Sheets with Cricut Print Then Cut? If not, it’s such a fun and easy project that makes great gifts.
With this tutorial you’ll learn how to print then cut Sticker Sheets on your printer and then cut it with your Cricut machine.
We also have extra clip art files available if you’d like to expand your collection.
Let’s get started with this easy step by step tutorial.

Download the Free Flower Bouquet PNG Files
You can find this file in my free craft file library. The file number is C4.
Buy the Flower Bouquet Clip Art Bundle
Get the bundle with multiple flower bouquet clip art files below and you’ll be able to use different flower bouquets for your project.
Want another topic? Check our full clip art selection in our shop.
Save on Pinterest!


How to Make Sticker Sheets With Cricut "Print then Cut"


Instructions
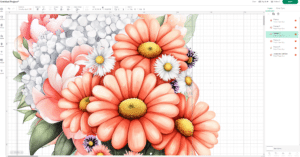
- Open Cricut Design Space and Click "New Project" in the top right corner.Upload your clip art to Cricut Design Space.

- Click "Upload Image" and click "Browse".

- Click "Open", "Continue" & "Apply & Continue".Select "Flat Graphic" and click "Continue".

- Give your image a name, place it in a folder (optional) & finally click "Upload".

- Repeat steps 3-5 to upload all the images you want to include on your sticker sheet.At this point you have multiple images on top of each other, and they may even be to big for your Cricut machine.

- Select all and reduce their size.

- Adjust the offset, to make the stickers easier to cut.Click on the image, then click "Offset", making the distance about 0.1 will work in most cases. Click "Apply".

- Then change the color of the offset to the color you prefer.

- Select the image and the offset and choose "Flatten".Then repeat the previous 2 steps to create offsets for all images.
- Add a guide to your page by clicking "shapes", select a rectangle and resize it to the maximum size for the sticker paper you are using.For letter size paper the maximum size is 7.44 in x 7.59 in.For A4 size paper the maximum size is 16.58 cm x 22.79 cm.

- Start placing them into the guide to and use the "align" options to help you space them out evenly.

- If you need more images to fill the sticker paper, select them and click "ctrl+c" + "ctrl+v" or click the "duplicate button in the layers panel.

- When you have placed enough images into the guide, select them all and click "Flatten".

- Keep the flattened images selected and click "Create Sticker" and "Kiss Cut".Since we already created the offset, select border "none" and leave "Die-Cut Edge" un-selected. Then choose "Apply".

- Click make.

- Select your material size & align the stickers to the center of the paper. Then click continue.

- Load your paper in the printer then click "Send to Printer".If you want to make adjustments on your end, choose "Use System Dialog". In the settings you can typically reduce the speed, opt for higher quality and choose the paper type you are using.

- Wait for it to print and click done.
- Choose the paper type you are using.

- Place the sticker paper on your cutting mat, load the fine-point blade in the machine and click the "load/unload" button.
- Press "Go" and let your Cricut machine cut your stickers.
- Click unload, remove the sticker sheet from the mat and your stickers are finished.


You've Now Learned To Create Sticker Sheets With Cricut Print Then Cut
I hope you enjoyed this detailed step by step tutorial showing you how to use your Cricut Maker to create sticker sheets.
It's such a fun and easy Cricut project, that you can easily create in under an hour.
Happy Crafting!
